
Look at Your Guitar Less Using Pivot Fingers
Updated 2023
Estimated time to read: 4 minutes
Are your eyes glued to your guitar instead of the music or even your audience? By using a pivot finger, you can play chords that require less finger movement and little to no looking at your hands.
Sections:
What is a Pivot Finger?
Example Chord Progression
Chord Progression Without a Pivot Finger
Chord Progression With a Pivot Finger
Wrapping it up
What is a Pivot Finger?
When two different chords share a note played by the same finger, that finger is called a Pivot Finger. It allows you to switch between these two chords while leaving at least one of your fingers in the same place on the guitar fretboard. If you always take all of your fingers off the strings when transitioning between chords, this technique will help you take your playing to the next level.
Example Pivot Finger Chord Transition
Before we start looking at chord progressions, let’s make sure we can recognize the use of a pivot finger when we see it. Here we have a common G major chord and an E minor chord (Em). Look at the finger numbers underneath the chord diagrams to see if there are any that match between the two chords. The numbers should be the same and the dots (that represent fingers) need to stay in the same fret on the same string in order for us to identify a pivot finger.


We can see that the second finger in the G chord moves to the D string in the Em chord, so that’s not a pivot finger.
The first finger in the G chord stays on the second fret of the A string in the Em chord as well, so that is a pivot finger.
Get out your guitar, if you haven’t already, and play these chords back and forth. We have to move the second finger to a different string each time, and the third finger comes off the fretboard altogether for the Em chord. But the first finger stays on the same fret on the same string for both chords.
This is a perfect example of a pivot finger.
Chord Progression Without a Pivot Finger
Using some popular chord voicings (shapes) we can randomly choose the following versions of the G, C, and D major chords for our chord progression.

Before we get into the analysis, play the chord progression on your guitar. Play through the chords to get a feel for how much finger movement there is. Think about the overall shape of your hand as you play each chord. Keep these things in mind as we continue with the lesson.
Now, to play these chords one after the other, we will need to move our fingers to different strings and to different frets, often changing the overall shape of our fretting hand. These things may seem trivial and may not matter to you right now, but every extra movement adds up.
This is especially important when you to look at your hands to make sure your fingers are pressing on the right strings and frets. You could be looking at the upcoming chords on your music, or other musicians on your team to see what cues they are giving.
Let’s see if we can reduce the movement in our fretting hand by selecting different chord voicings. These are the same chords, G, C, and D major, and the voicings are also common among rhythm worship guitarists so it’s not like we are playing strange or unknown chords. However, they are different and may include an extra note not in the triad.
Chord Progression With a Pivot Finger
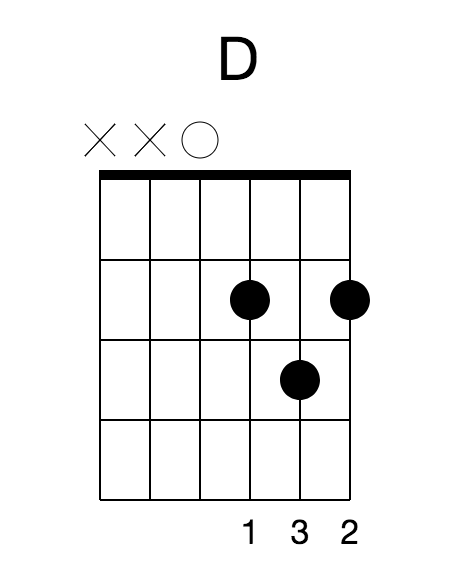
The new chord voicings are:
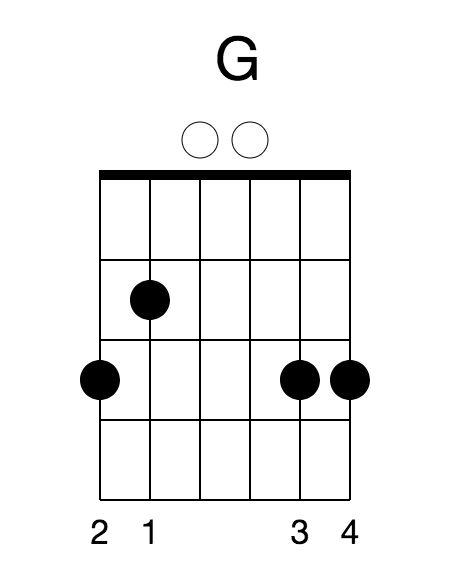
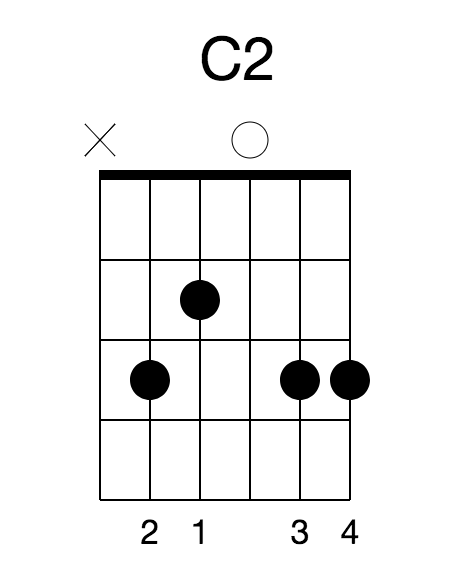
Again, before we talk about these chords, play them on your guitar. How much finger movement is there? Think about the overall shape of your hand as you play each chord. How does this compare to the previous chord choices?
The most obvious difference is that your hand position stays the same for all the chords using these voicings compared to the previous voicings.
Another difference is there are one to two fingers that stays in the same position. The third finger stays on the second (B) string, third fret through the whole chord progression. Depending on the exact chord voicings, you could easily use the fourth finger as another pivot finger between the G and C major chords on the first (e) string, third fret.
Wrapping it up
Instead of playing the same chord voicings you normally play, you can now choose slightly different chord voicings that use pivot fingers and reduce the need to look at your hands while playing chords. The next time you play a song, take a few minutes to try some different chord voicings instead of the ones you always play, you may just be able to look at your guitar and hands less.
Related Post: Transition Smoothly Between Chords Using Guide Fingers