
Transition Smoothly Between Chords Using Guide Fingers
Updated 2023
Estimated time to read: 4 minutes
Chords changes can be nerve-racking sometimes, but a guide finger may be the solution to help you transition up and down the guitar fretboard. You may already use guide fingers when changing chords on guitar and might not even know it. Let’s look at how you can use guide fingers to make your chord transitions even smoother.
Sections:
What is a Guide Finger?
Guide Fingers in Open Position
Guide Finger Technique
Guide Fingers in Bar Chords
Wrapping it up
What is a Guide Finger?
When you transition between chords going up or down the guitar fretboard and a finger is played on the same string for both chords, this is considered a guide finger. Said another way, it is a finger that stays in contact with a particular string as you change chords. The starting chord and ending chord use that finger on the same string for each chord.
Guide Fingers in Open Position
The first example here is a fairly common chord transition between a D major and an A major chord in open position.
When we look at the fingers used on the D and A chords, are there any fingers that stay on the same string for both?
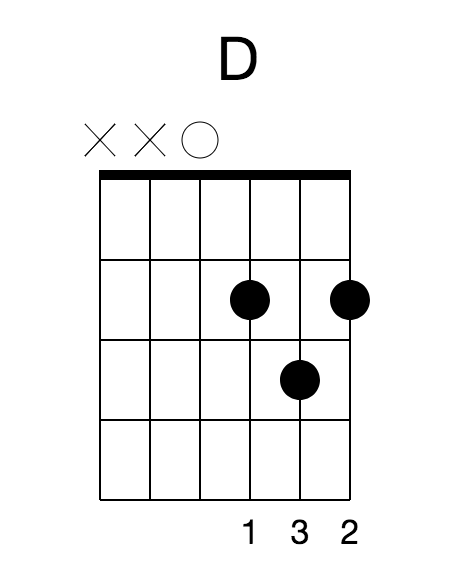
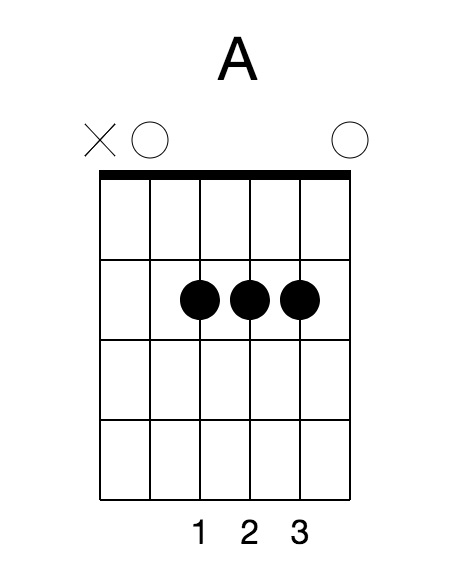
Yes, the third finger stays on the B string. This is a guide finger.
Play the chords on your guitar and you will see how comfortable it is to keep the third finger on the B string when you transition between the chords.
Guide Finger Technique
One thing to keep in mind when playing chords that involve a guide finger is you don’t need to keep your finger pressed on the string during the chord transition.
In the case of the chord transition between D and A, you can (if it feels more comfortable and sounds good) keep your third finger pressed down while transitioning. This involves a bit more technique in making sure the chord transition sounds good, but it is possible.
On the other end, you also don’t need to take your finger entirely off the strings since you will be placing your finger right back down again on a different fret.
You can end up somewhere in the middle and keep your finger in touch with the string, but not pressed down as you move your finger up or down the string.
If the guide finger is on the lower strings or you are moving a further distance on a string, as we will look at in the next section, you may keep your finger hovering right above the string to be ready once the finger arrives at the correct fret. This helps remove any squeaking sounds that usually happen when fingers are in contact with the strings for multiple frets.
Guide Fingers in Bar Chords
Another common way to use guide fingers is playing bar chords, power chords, or any movable chord shapes up and down the guitar fretboard.
With these types of chords, the chord shapes are the same but can be played in different positions up and down the fretboard.
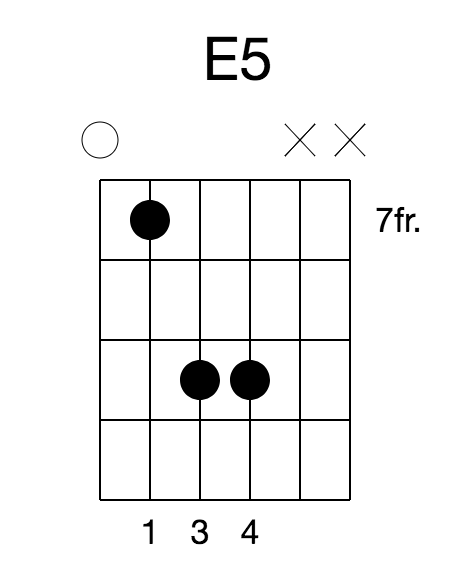
In this example, the B power chord (B5) on the second fret would transition to the E power chord (E5) on the seventh fret.
Note: Power chords are often labeled as a “5” chord, like “B5” because they only include the root note and the fifth note, hence the 5. This is different from a major or minor chord because the third is omitted from the chord and doesn’t have a major or minor tonality.

How many guide fingers do you see? If you’re not sure, play this chord transition on your guitar.
When we play B to E power chords on the guitar, our fingers don’t change strings. Instead all three of our fingers (first, third, and fourth fingers) stay on the same strings, but move to new frets. That makes them all guide fingers.
This is different than using the B power chord on the seventh fret, as there aren’t any fingers that stay on the same strings. Even though it’s the same chord (B5), there aren’t any guide fingers in this chord position. Keep this in mind when choosing chord voicings.

One important note about the technique for moveable shapes is to be aware of potential squeaking sounds and to adjust your fingers accordingly.
Wrapping it up
Being intentional with your chord choices and using simple techniques like guide fingers and pivot fingers, you can improve your playing and experiment with using different chord voicings. Remember to adjust your technique as needed to remove any squeaking sounds you may hear when keeping a guide finger in contact with a string across multiple frets.
Related post: Look at Your Guitar Less Using Pivot Fingers